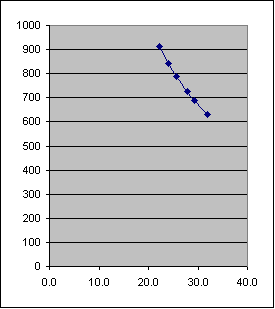
Graph of Boyle's Law
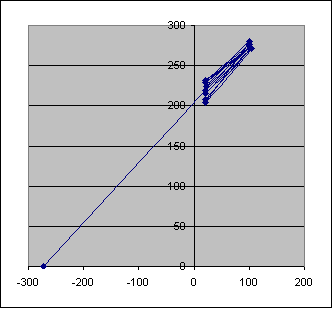
Graph of Charles' Law
Experiment 11
Gas Laws
In this lab we will examine two of the most important gas laws: Boyle's Law and Charles' Law. These two gas laws describe the relationships between Pressure and Volume (Boyle's Law) and Temperature and Volume (Charles' Law).
The pressure of a gas is a measure of the number of times gas molecules hit the side of the container or the appropriate measuring device, such as a barometer. According to Boyle's Law, the pressure (P) of a gas is inverserly proportional to the volume (V) of the sample of gas. For example, if the pressure gets larger, then the volume gets smaller, and vice versa. A mathematical representation of this concept is P1V1=k (a constant). If you change either the pressure of the gas or its volume, the same contant (k) must be obtained if you multiply the pressure times its volume (P2V2=k). Alternatively, one can compare directly the pressure and volume at two different conditions using the following relationship, which is a mathematical representation of Boyle's Law: (P1V1=P2V2).
In an experiment, the volume of a specific amount of gas is measured at different pressures while the temperature is kept constant (for our experiments, temperature is held constant for Boyle's Law and pressure is held constant for Charles' Law). You will work with the results given in the report table. Determine the PxV product by multiplying the pressure and the volume in each sample. Round off the product togive the correct number of significant figures.
Pre-Lab Study Questions
1. What are some occassions that require you to measure the pressure of a gas?
Ā
2. Why is an airplane pressurized?
Ā Ā
3. Why does a scuba diver need increased gas pressure in the air tank?
Ā
4. How does temperature affect the kinetic energy of a gas molecule?
Ā
5. If you start with a pressure (P1) of 1.2 atm and a volume (V1) of 2.5 L, and change the pressure to 3.6 atm (P2), what would be the resultant volume (V2)?
Ā
ĀĀ
Boyle's Law
Use the table below to determine the PxV values at the different conditions.
| Reading | Pressure (P) | Volume (V) | P x V (Product) |
| 1 | 630 mm Hg | 32.0 mL | Ā |
| 2 | 690 mm Hg | 29.2 mL | Ā |
| 3 | 726 mm Hg | 27.8 mL | Ā |
| 4 | 790 mm Hg | 25.6 mL | Ā |
| 5 | 843 mm Hg | 24.0 mL | Ā |
| 6 | 914 mm Hg | 22.2 mL | Ā |
You can also express your data graphically. ĀGraph the above data where the Pressure is on the Y-axis and the Volume on the X-axis similar to the first graph below (these data were generated during a lab).
Graph of Boyle's Law
|
Graph of Charles' Law
|
1. According to the graphical representation of Pressure vs. Volume, what appears to be the relationship between pressure and volume?
Ā
2. On your graph, what is the volume of the gas, if the pressure is 760 mm Hg?
ĀĀ
3. On your graph, what is the pressure of the gas when the volume is 30.0 mL?
Ā
4. Complete the following table for the unlisted value, based on whether the pressure or volume changes (at constant temperature).
| Pressure | Volume |
| increases | Ā |
| Ā | increases |
| decreases | Ā |
5. A sample of He has a volume of 325 mL and Āpressure of 655 mm Hg. What will be the pressure if the He is compressed to 125 mL (constant temperature)?
Ā
Ā
6. A 75.0 mL sample of oxygen has a pressure of 1.50 atm. What will be the new volume if the pressure is raised to 4.50 atm?
Ā
Ā
Charles' Law
Charles' Law relates to how temperature affects the volume of a sample of gas. ĀIn today's experiment, you will determine the relationship between temperature and volume. ĀUsing these data, you will be able to extrapolate your experimental data to determine a value for absolute zero on the Celsius scale. Ā
You will experimentally determine the volume for a sample of gas at a high temperature and at a lower temperature for the same sample of gas. ĀBased on these data, you will graph your results, with volume on the Y-axis and the temperature (oC) on the X-axis. ĀAfter you have graphed these data, you will then extrapolate (extend) your line between these two points to intersect the X-axis at a point when the volume would be zero. ĀThis intersection point will represent the temperature when the volume of gas would extrapolate to zero, and represent the value for absolute zero on the Celsius scale. Ā(How close did you come to the actual value for absolute zero on the Celsius scale?)
You will need the following equipment:
You will begin your experiment by placing a dry 250-mL Erlenmeyer flask into your beaker. ĀAdd enough water to come up to the narrow neck of the flask and start heating your sample. ĀBoil gently for about 10 minutes to bring the temperature of the air in the flask to that of boiling water (the volume of gas occupied in the flask and tubing is the volume [Vboil]of gas at boiling temperature). ĀWhen you are ready to remove the flask, measure the temperature of the water (Tboil). Ā You could convert the temperature to Kelvin, but you do not need to immediately.
After you have determined the temperature of the boiling water, clamp the latex tubing, and remove the flask from the boiling water. ĀImmediately place your hot and still clamped flask into room temperature water (a deep pan or sink can be filled with water). ĀKeep the flask fully immersed below the water line. ĀCarefully remove the clamp, and let the cooler water flow into the flask. ĀKeep the flask immersed in the water for at least 5 min. ĀThis will allow the gas on the inside of the flask to attain the temperature of the surrounding water. ĀWhile the gas cools, it will decrease in volume, sucking water into the flask. ĀWhen you are confident that the temperature of the flask is the same temperature as the surrounding water, you need to do two things to obtain correct data. ĀFirst, measure the temperature of the water. ĀThis temperature should be the temperature of the gas inside the flask. ĀSecond, keeping the still stoppered flask below the water level, raised the flask (with stoppered end pointed down), so that the water level inside the flask is exactly level with the water in the sink. ĀReclamp your flask so that no water can flow into the flask, or flow out.
Caution: There are several sources of error that you should be careful to avoid.
After you have removed your cooled flask from the cool water, you must measure the amount of water that was "sucked" into the flask during cooling (Vwater). ĀThe volume of gas (Vcool) is calculated to be the difference from the total volume of the flask assembly (Vboil) and the amount of water in the flask. ĀAfter you measure the volume of water "sucked" into the cool flask, you will need to determine the total volume that gas could occupy (Vboil). ĀTo determine this volume fill the flask completely with water. ĀInsert the stopper and tubing into the flask. ĀExcess water should flow out the tubing. ĀThen, carefully, remove the stopper assembly allowing any water in the stopper to flow back into the flask. ĀThen, you will need to measure the amount of water remaining in the flask. ĀSince you only have a 100-mL graduated cylinder, you will need to fill this cylinder several times, making certain that you accurately record the volume of water during each addition. ĀThe total volume of water will be the volume of gas in the flask at boiling temperature (Vboil). ĀTo obtain the volume of gas at the cool temperature (Vcool), you will need to subtract the volume of water in the flask (Vwater) from the total volume of the flask (Vboil). ĀYou now have the two volumes necessary for graphing your data.
Graph your data with volumes shown on the Y-axis and the temperatures on the X-axis. ĀIf you do not plot your temperature in Kelvin, please allow the X-axis to start at -300oC up to about 100oC.
You should repeat the experiment at least once more. ĀBe sure to start with a clean and dry flask for each experimentl. ĀYou can use a different flask, but you need to determine the volume of the new flask using the procedure described above.
1. According to your graph, what is the predicted Kelvin temperature of absolute zero? What is the predicted temperature of absolute zero in oC?
Ā
ĀĀ
2. How does your predicted valoue for absolute zero compare to the accepted value of 0 K?
Ā
Ā
3. Using your graph, how are temperature and volume related?
Ā
Ā
4. Indicate the change expected when pressure is held constant for a given amount of gas.
| Temperature | Volume |
| Increases | Ā |
| Ā | Increases |
| Decreases | Ā |
| Ā | Decreases |
5. A gas with a volume of 525 mL at a temperature of -25oC is heated to 175oC. ĀWhat is the new volume of the gas if pressure and number of moles are held constant.
Ā
Ā
6. A gas has a volume of 2.8 L at a temperature of 27oC. ĀWhat temperature (oC) is needed to expand the volume to 15L? (pressure and moles are constant)
Ā
Ā
Preparation of gases
You will prepare two different gases for this experiment. ĀThis section describes the chemical methods required to prepare the two different gases; O2 and H2.
Individual gases are prepared using the chemical procedures shown below, which describe the protocol and setup conditions for the collection of gases. Ā
The reactants for each of the individual reactions are placed in a 250-mL Erlenmeyer flask. ĀA thistle-tube assembly (a two-hole stopper with a long tube with a funnel at the top and another tube with rubber tubing attached) is placed into the opening of the flask. Solid reactants are added to the flask prior to attachment of the thistle-tube assembly. ĀLiquids are added through the thistle tube. ĀThe bottom of the thistle tube (inside the flask), must be covered by liquid in the flask (either water or added liquid reagents). ĀThe outlet tubing is used for the collection of gases. ĀTo collect the gases, you will use a downward-displacement procedure. ĀThe collection bottles are filled with water. ĀUsing a pneumatic trough, add enough water to cover the shelf. ĀCover the water-filled bottle with a glass plate, invert the bottle and place the opening of the bottle under water, resting on the submerged shelf (be sure to remove the glass plate from the mouth of the bottle). ĀWhen you are ready to start collecting your gases, place the mouth of the inverted bottle over the bubbling tubing, and collect your gas, as the water is forced out of the bottle (downward displacement of the water). ĀAfter the bottle is full of gas, place a glass plate over the opening (before you remove the bottle from under the water to seal the gas in the bottle) and place the bottle on the bench. ĀFor O2 store the bottles in the usual position (since O2 is more dense than air, it will stay in the bottom of the bottle). ĀFor the H2, however, store the gas with the bottle inverted (bottom-side up) because the H2 is less dense than air, and will stay at the top of the inverted bottle. ĀIf you stored the H2 bottle in the usual position, the glass plate might leak, and allow the H2 gas to escape. ĀWhenever you use the H2 gas for experimental purposes, keep the bottle inverted. ĀThe O2 bottle is used as normal, not inverted.
Oxygen
You will produce oxygen (O2) by reacting hydrogen peroxide (H2O2) in the presence of MnO2, which is the catalyst (a catalyst is not consumed but simply speeds up the rate of reaction). ĀThe oxygen you collect must be stored in covered bottles until ready to be used (O2 is more dense than air, and will stay in the bottom of the bottle). ĀThe equation below shows this reaction.
![]()
Use a pea-sized amount of MnO2 (not very much), and put it into the reaction flask. ĀAdd the thistle tube assembly, and add about 25 mL DI water (if the bottom of the thistle tube is still above the water level, add a little more water to cover the bottom of the tube). ĀAcquire about 50 mL of 9% H2O2 (hydrogen peroxide) and start the reaction by adding 5-10 mL into the funnel of the thistle tube. ĀYou should observe a gas forming, and bubbling into the pneumatic trough. ĀStart collecting the oxygen gas, filling the first bottom. ĀContinue collecting O2, until you have the number of bottles you desire. ĀContinue to add the hydrogen peroxide solution, to maintain an active gas-producing reaction. ĀWhen you are through, empty the reaction mixture into the appropriate waste container.
Hydrogen
You will produce hydrogen (H2) by reacting zinc metal with concentrated H2SO4.
Zn(s) + H2SO4(aq) → ZnSO4(aq) + H2(g)
Place about 10 g of zinc in a 250-mL Erlenmeyer flask, and add about 2 mL of 0.1 M CuSO4(aq) as catalyst (do not add more CuSO4). ĀAdd enough water (less than 50 mL) to cover the bottom of the thistle tube which has been inserted into the flask. ĀInitiate the reaction by adding 4-5 mL of 18 M H2SO4 (concentrated sulfuric acid) through the thistle tube. ĀAdd more acid, in 4-5 mL increments, as needed, to maintain a steady production of gas (H2) that can be collected into the bottles. ĀContinue to collect the number of bottles that you need for your experiment. ĀDiscard the contents of the reaction mixture into the appropriate waste container.
The first bottle collected will contain some oxygen (as part of the air which initially filled the flask) until totally displaced by the generated hydrogen. ĀTo avoid collection of oxygen, allow the gas to flow into the pneumonic trough for a minute so that you can collect only hydrogen.
Analysis of gases
Combustion is the chemical process of combining molecular oxygen (O2) with another element or compound. ĀCombustiojn products depend on which elements are combusted. ĀFor example, when carbon is combusted, CO2 is produced. ĀWhen hydrogen is combusted, H2O is produced. ĀOxygen supports combustion, but is not itself combustible. ĀHydrogen does not support combustion, but does combust. ĀCan you explain the difference between something that supports combustion and something that actually combusts?
Since oxygen supports combustion, flames should be more intense in the presence of oxygen than in its absence or in lower concentrations. ĀFor example, normal air contains about 20% oxygen. ĀYour collected bottles of oxygen will be close to 100% oxygen. ĀDo you predict a different if a glowing wooden splint is inserted into a bottle containing almost pure oxygen and a bottle containing only air?
To do this experiment, collect several bottles of oxygen gas. ĀAfter collection store them with a glass plate placed across the top of the bottle. ĀWhen Āyou are ready to do the experiment, remove the glass plate and insert your glowing wooden splint. ĀTo do this, using a match, ignite the wooden splint. ĀBlow the flame out, but maintain a glowing end. ĀInsert this glowing end into the bottle of oxygen. ĀWhat are your observations? ĀRepeat. ĀNow, insert a glowing splint into a bottle of air. ĀIs there an observable difference?
Hydrogen is combustible. ĀAfter you have collected your hydrogen gas, you will need to combust the hydrogen. ĀTo do this experiment, take a lighted wooden splint and insert it into the bottle of hydrogen. ĀYou should be storing your hydrogen bottles inverted, so that the hydrogen gas stays in the bottle. ĀRemove the glass plate and, keeping the bottle inverted, insert the burning splint into the bottle. ĀWhat do you observe? ĀPull the burning splint out, and then insert it back into the bottle. ĀDoes the flame go out? ĀWhy? ĀNow, with a burning splint, take the bottle of hydrogen gas and turn it upright, and place the splint above the bottle. ĀWhat do you observe?
How do your experiments show that oxygen supports combustion and hydrogen is combustible but does not support combustion?
Go To Experiment:
1 2 3
4 5 6
7 8 9
10 11 12
13
Return to Chem100 Experiments Index